Illuminating Sprites using IffSnooper
A BIT OF BACKGROUND:
In the sims the lighting is a bit strange. It does not actually shine on objects but will on floors (flooring, not terrain) and walls. Anyone who's ever made a courtyard and painstakingly added lights around for a wonderful nighttime effect knows exactly what I mean. Objects have two states … they are in the dark (and become dark to reflect that) or in the light (and become highlighted to reflect that). Light can be the "sun" in the daytime or a well-lit room at any time.
It's all very logical for the most part but some things in the game are meant to seem like a light source (without actually behaving like one) and it's always a bit odd to see those things go dark. This tutorial fixes that problem.
Instructions for achieving the same effect with IffPencil2 can be found in the ***PC Hacking Tutorial***
GETTING STARTED:
You will need Iff Snooper version 1.1.9b10 (or a later version) to complete this tutorial. Earlier versions do not have the 'Glow' feature.
NOTE: tutorial instructions are in black text, anyone experienced with iff snooper should be able to follow reading only the black text. Brown text gives general iff snooper instructions, such as how to clone a file, how to export sprites, etc for anyone less experienced with the program.
Open your cloned Rave Table in iff snooper. I named my clone tutTableRave.iff and that is the file name I will refer to in the tutorial, so you might want to use the same name for this project. I am also choosing the default file names that come up in the process, and refer to project files by those names, so you might also want to do that for the purposes of the tutorial.
(To clone an object in iff snooper, select 'Enter Cookie' from the Edit menu, and enter your Magic Cookie number in the box in the pop up. Hit return to get the Hex value and then OK. Your cookie is now entered. Then choose 'Clone' from the File menu. Name your file and Save to Desktop. Your clone will appear on your desktop. Close the original file and open your clone in iff snooper to work with it. NOTE, you don't have to always save to Desktop, you can do all this into project folders, I'm doing all this on the desktop just because we all have one, lol. )
1. Disassemble the file and export the sprite frames.
(To disassemble, choose 'Disassemble' from the Export menu in the toolbar. This will produce a folder of resources on your desktop, named *tutTableRave.iff To export the sprites, choose 'Sprite Images' from the Export menu. This will produce a folder of sprites [bmps] on your desktop, named tutTableRave_sprites. The sprites are the bmp graphics you will be working on in Photoshop or your graphics program)
2. Open your sprite folder on the desktop. (called tutTableRave_sprites if you named it the way I did.) Inside there will be a folder named sprite0100. Click the file to highlight it and then choose 'Duplicate' from your desktop 'File' menu. You now have a folder called sprite0100 copy. Change it's name to sprite0101.
Inside these folders are the sprites you will be using in step 3.
3. Open Photoshop (or your other graphics program) and follow Raeven's instructions for the editing the graphics of the large table sprites. Remember to repeat those steps for the smaller zooms of the file. (TableRave_medium_all and TableRave_small_all files).
4.
When you made the new graphics for all 3 zooms, go back to iff snooper and
import your sprites.
(Choose 'Sprite Frames' from the Import menu in the toolbar, and choose the tutTableRave_sprites folder to import all the sprites, the original table and your new lights sprites at the same time.)
Once the sprites are imported, Encode and Save them. The drag and drop the new resources onto your disassembled file, overwriting the existing files where applicable.
(Click the 'Encode and Save' button on the right of the screen. The pop up will suggest you name the file *New Resources. Go ahead and click 'Save' and a folder called *New Resources will appear on the desktop. Open the New Resources folder, there will be 4 files inside: PALT resource 0, PALT resource 1, SPR2 resource 100, and SPR2 resource 101. Drag and drop all 4 resource files over the the *tutTableRave.iff folder that was created when you Disassembled your file in the Export menu in step 1. You will be asked if you want to overwrite the file already in that folder. Yes, you want to overwrite all the files.)
5. Import the *tutTableRave.iff resources.
(Choose 'Resources' from the iff snooper 'Import' menu. Then select the *tutTableRave.iff folder. A pop up will come up with tutTableRave.iff in the file name field. Click 'Save' and a pop up box will tell you this will replace the file you currently have of that name. Yes, you want to replace the file.)
6. When the file is assembled, it will appear on the desktop, replacing your initial clone. Open it in iff snooper. Then, open the DGRP window of the file.
(The DGRP window is where you make adjustments to your object's x and y coordinates, which changes the way it sits in the game. Click the 5th button, labeled DGRP in the iff snooper screen to open it, or choose DRGP-Single Sprite view from the View menu in the menu bar at the top of the screen, {command-3 on the keyboard})
To the right of the image of the object in the screen is a box labeled Edit sprite list.
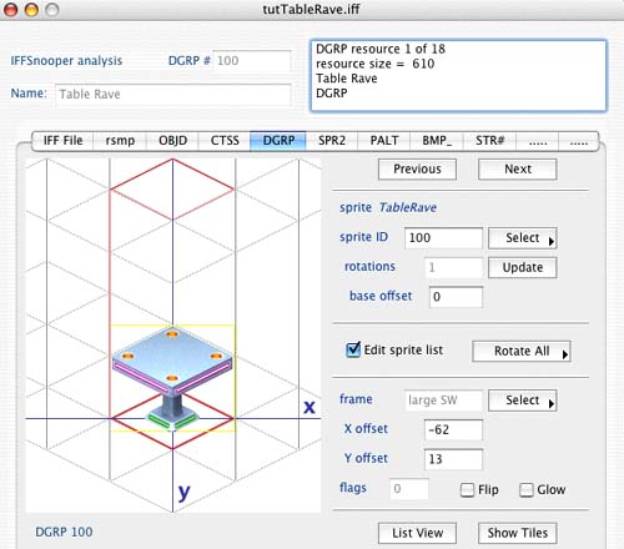
Check it, and you will see the sprite ID window above go from being to grayed out to black. Now, it is editable. Next to the sprite ID window (which should be currently displaying '100' in the now editable box) is a button labeled 'Select'. Click this and it will open a submenu, with just the Add Sprite on offer. Choose 'Add Sprite' Then enter 101 in the Sprite ID box and hit the Tab key. (You may encounter an error message at this point: this is a bug that won't effect your object and will be fixed in a later version of iff snooper. Just click past it and continue.) Uncheck Edit Sprite list for the rest of this.
Now when you click the Select button beside the sprite ID box, you will be able to toggle between Sprite 100, TableRave and Sprite 101, TableRave.
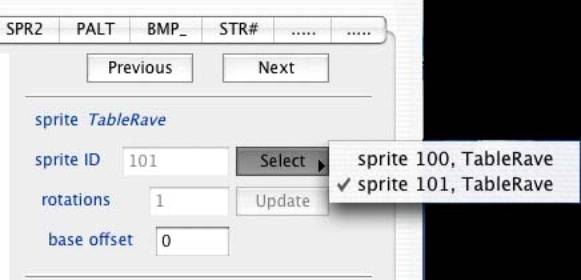
Choose Sprite 101, TableRave, and you will see the light strips you created in step 3 in the window. From the View menu in the toolbar, choose DGRP resource> Multisprite View and Use all channels. Now you will see the table, and your light strips on top of it. The light strips will not be placed properly over the table, so you will need to adjust the x and y coordinates. Raeven has kindly provided those coordinates for us: large -59, 9. medium -29, 4. small -14, 2. You will need to make these adjustments for all 4 rotations, all 3 zooms.
(The x coordinate moves the sprite left and right, and the y moves it up and down. Make these adjustments in the boxes labeled X offset and Y offset towards the bottom of the screen by entering the new number in the field and hitting the Tab key to see the change in your window. The DGRP automatically opens with the large SW view of an object. In the box labeled 'frame' you will see 'large SW' in the window. Use the 'Select' button next to that window to change the rotation and zoom, each is labeled by size and compass direction. You will need to adjust the X and Y offsets for each rotation and zoom of this object. Since this object uses the same image for all 4 rotations, the X and Y coordinates are the same for all 4 rotations. On objects where the view is different in different rotations, the X and Y also may differ.)
Once you have made the adjustments to the X and Y coordinates for all zooms and rotations, your light strips will blend into the table seamlessly.
7. Beneath the X and Y offset boxes are two buttons, one labeled 'Flip' and the other labeled 'Glow'. (Versions of iff snooper previous to 1.1.9b10 will not have Glow. This requires 1.1.9b10. ) The Glow feature is what will make your light strips stay light at night while table gets dark, and make it a light source as well. Check the 'Glow' box, and it automatically checks Glow for each rotation and zoom of the sprite. So you only have to check Glow once.
8. Change your CTSS description to something like Rave Table Lit so you'll know which is your table when you test it in the game. And Save. You're done. Place this table on a lot, outside at night to see it glow.
(open the CTSS screen of your object (the button next to DGRP) Click the Edit button on the bottom of the screen and an editable window will pop up. Change the object's name in the Object Name field and change the description in the Object Description field. This is the information you see when the object is in the Buy catalog of the game. Check the 'Replace text in all languages' box to change the object descriptions in all language versions of the game. It does not translate the text into other languages, it imposes your new text in whatever language you wrote it in on every language version. Players on other language games have told me they prefer this to getting the Maxis description in their own language. To save your file, choose 'Save' from the File menu in the toolbar. If you keep the same name on the file, it will ask if you want to replace the current file. Yes, you do.)