Turning an Object into a Light Source
Mac users will need to use IffSnooper's BHAV editor. I've no instructions for that here at SSoW but you can learn to use the editor from Peter Gould's Understanding the BHAV resource. If any mac users would like to contribute a "translated" version of this process I'd be delighted to add it to the Woobsha Workshop.
Some basic info on lights in The Sims.
An object is "A Light" because of three simple steps:
That's it.
Lamps often have other things going on inside of them like figuring out if they should turn on automatically and whether they should break and, if broken, how they should be repaired. Some are expensive/decorative so have additional coding to effect room score and most lamps tend to have least 2 graphics states: on and off, and the animated lamps (such as candles, lava lamps and hula girls) have several additional graphic states (on1, on2, on3, etc) that they flicker through while turned on. But the actual LIGHTING part boils down to those three basic steps mentioned above.
When lamps "turn off" all they are doing is changing the light casted to zero and displaying the graphic that looks "off". "Turn on" is the same process: change the light it is casting to 75 and display the graphic that looks "on". Lighting is not dependent on a graphics change, however. A lamp can have a single graphic and just change the light it casts. Another variation is to tell it to cast, say, 75 units of light and then never give it any other instructions on the matter and -=*poof*=- you have a light that never turns off at all.
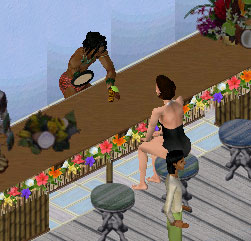
abrks' Tiki Bar Floral Trimmings made into an "Always On" light source
 Annette's made a really festive floral trimming for decorating the sides of counters, tables and anything else you can think of as part of her Build Your Own Tiki Bar set and wanted one as a light source as well. This item must share the same tile as other objects (a counter, for instance) and so Annette has used a one tile rug as a base. This rug was created using the Rug-o-matic from Lush Creations.
We begin in the init BHAV and in this object that is BHAV#4101 ("init common")
Why "Common"?
Some INIT BHAVS are called common because in a multi-tiled object, a larger rug for example, this BHAV would have some really basic rules that all of the tiles share. In a rug that would include things like allowing sims and objects to walkover and /be placed on top of itself. All tiles in a multi tiled rug share those qualities so rather than write them over again in the INIT BHAV for each tile one common BHAV is made and each of those INITs refer to it. Major plus here is any change made in common automatically applies to every tiles. The individual tiles do have some rules that are different. For instance, a tile in the center of a 3X3 rug should not allow walls on any of it's 4 sides (to prevent a wall being built right through the rug) while a corner piece can allow walls on two of its sides but not the two that connect to other rug pieces. Those rules are stated in the individual INITs.
1) GENERATE LIGHT:
Open BHAV 4101 in IffPencil and add a line (right-click in the main window and choose "Add" from the menu that appears). Add three more lines the same way. You should now have lines 10, 11, 12 and 13.
Whichever line currently ends in "True" ( in this case the one that reads "My room impact Assign To: 80") should be altered so that first new line number (which is 10) is there instead of "True")
Since for the life of me I can't remember the values for the generate light line at the moment I'm opening a second IffPencil window and loading in the first light source I see into it. Ah, there in it's init: "My flag field 2 Set Flag GeneratesLight".
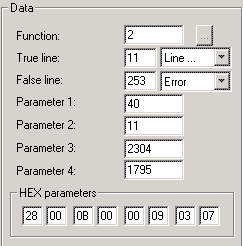 Enter the following into Line 10's Data box
(I recommend entering them from parameter 4 up to parameter 1 and watching the text changes)
- Function: 2
True line: 11
False line: 253
parameter1: 40
parameter2: 11
parameter3: 2304
parameter4: 1795
in the end the text for that line should read
- My flag field 2 Set Flag GeneratesLight
2) WHAT TYPE OF LIGHT:
 (This is another "My" line and you'll note that parameter four is the same as above)
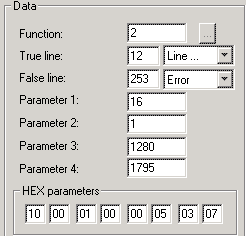
Enter the following into Line 11's Data box (I recommend entering them from parameter 4 up to parameter 1 and watching the text changes)
(This is another "My" line and you'll note that parameter four is the same as above)
Enter the following into Line 11's Data box (I recommend entering them from parameter 4 up to parameter 1 and watching the text changes)
- Function 2
True line: 12
False line: 253
parameter1: 16
parameter2: 1
parameter3: 1280
parameter4: 1795
in the end the text for that line should read
- My light source Assign To: 1
3) HOW MUCH LIGHT:
 This one is a bit different as we're going to put a global call in. Inside of global.iff (which is inside of global.far) they have snippets of code already typed out that any object can use and we are going to use one of those. Since any object could be using these snippets of code the codes need to be pretty generic so you must make sure your "stack object" (the object your code is focusing on at the moment) is the right one before running any global calls.
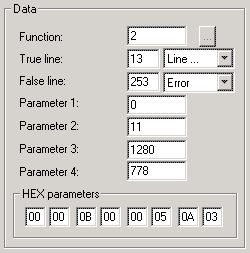
The object we want the code to apply this all to is the tropical garland itself so we are going to add a line stating that "Make me the stack object" For line 12, enter the following into the Data box
- Function 2
True line: 13
False line: 253
parameter1: 0
parameter2: 11
parameter3: 1280
parameter4: 778
Line 12's text should now should read
- Stack Object ID Assign To: My object id
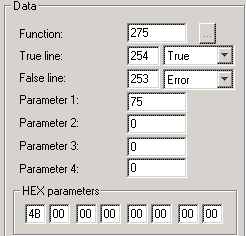 For line 13, the last line, enter the following into the Data box
- Function 275
True line: 254
False line: 253
parameter1: 0
parameter2: 0
parameter3: 0
parameter4: 0
Unlike the screenshot to the right your text will now read
(glob:) set object lighting (00 00 00 00 00 00 00 00)
Often with global calls I'd say fill the Hex boxes with F's to make all of those zeros go away but this time they are being used by that global BHAV that we are asking to run now.
![]()
Those 8 sets of zeros are 'object' parameters 0 through 7 which, confusingly enough is not the same as your BHAV's "parameter 1" and "parameter2" in the data box. I've noticed when hacking other objects that coding usually refers to those 8 object parameters as "sp" so I will as well. (I can only assume "sp" stands for 'stack parameter' or 'stack object parameter' or something but since I've never really understood what a "stack" is, I ignore the word itself.)
Right now 'sp0' is zero (well, ok they all are). The code we are asking to run will set the lighting using the number in 'sp0' so right now the object will cast zero light. By putting "75" in (databox) parameter 1 you'll see 'sp0' changes to the HEX equivalent of 75: 4b. (You'll also note the first HEX BOX below also now reads 4B)
in the end the text for that line should read
- (glob:) set object lighting (4b 00 00 00 00 00 00 00)
To finish up. We 'OK' out of the BHAV editor and save the object. It is now a light source that never turns off and has no bulb to break.
If you'd like the light to be a brighter light source then put up to 100 into the databox's parameter 1 (which will be 64 in HEX). Numbers higher than 100 appear to have no greater effect on the lighting.
Lighting in The Sims is not all we'd like it to be
Unfortunately, for the player there is VERY little visible difference between using 1 or 100. The exact same circle of light will shine on the floors and walls (and light ONLY shines on floors and walls, not objects or terrain - visually it's either On or Off. The value does make a difference, however, in how many lights are needed to make a whole room bright. This will only be apparent in a very large room, of course.
The amount of light also effects the overall room score, but I am not certain if the Sim is actually reacting to the amount of light or the amount of dark (in other words a room that can become totally lit with two small lamps (75+75=150) will presumably have 0 darkness. Putting better lamps in (100+100=200) is still 0 darkness. If the Sim is reacting to the light then 200 is better than 150. If, however, the Sim is reacting to the dark then 0 is 0 and it's the same thing to him)
 One more thing that I touched on earlier but is worthy of repeating even in an article this long:
Light wont shine on objects or terrain (floor with no flooring tiles on it). Most times when people are unhappy with the way an outdoors area looks and think they need more lighting the fact of the matter is that lighting wont help them. They want objects to gleam and be highlighted and that is not the way the lighting works in this game.
One more thing that I touched on earlier but is worthy of repeating even in an article this long:
Light wont shine on objects or terrain (floor with no flooring tiles on it). Most times when people are unhappy with the way an outdoors area looks and think they need more lighting the fact of the matter is that lighting wont help them. They want objects to gleam and be highlighted and that is not the way the lighting works in this game.
The screenshot to the right is a perfect example. The wall sections behind the bartender show circles of light, the flooring beneath the counter and chairs is gleams brightly but the counters and chairs themselves are not giving a strange sort of effect.
If you feel the odd shadows that the game can cast will be distracting with your particular object you might consider making it a faux light - one that does not generate light at all but does have that glowing, luminous look. (The last page of the "Luminous Sprites" tutorials have great examples of this sort of object)
Next question - How would I make it light up at night, instead of being on all the time?