Applying sswPatches
IMPORTANT: These are generic patching istructions. Be sure to check the readme included with the sswPatch zip to see if there are any special instructions for that particular patch.
This page includes 2 sets of instructions. One set is for PC users and explains how to apply the patches using IffPencil. The other is for Mac users and explains how to apply the patches using IffSnooper:
 Applying sswPatches with Iffpencil
A Windows Tutorial
Start off by downloading (and unzipping) the patch you need. While the patch is offered as an IFF file it is not an object and it is not something you install in your game. You can download it to any spot on your computer that is convenient storage for you.
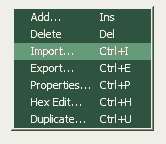
Choose the object you want to patch and opening it's iff file in IffPencil. The first step is to import the patch.1) In IffPencil, click CTRL + I on your keyboard (or right-click in an empty spot and choose "import" from the menu that appears).
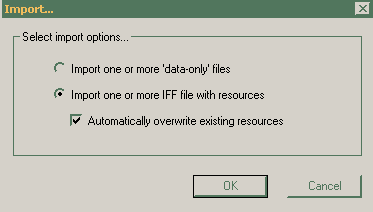
2) Select the bottom option ("Import one or more IFF file with resources") and you can also select it's sub option ("Automatically Overwrite existing resources"). If you forget to select the sub-option, don't worry. It'll ask you later if you want to overwrite and you can click yes then.
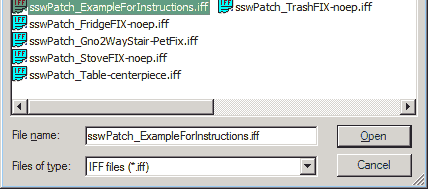
3) Navigate to and select the patch's iff file.
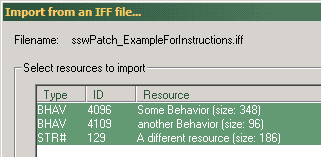
4) The resources inside are all selected by default already so just click OK.
Save your newly patched file and that's it (for the generic instructions)!
 Applying sswPatches with IffSnooper

A Mac Tutorial
To use these patches & fixes for Mac, you need Iff Snooper. (under 'Programs')
HOW TO USE/APPLY THESE PATCHES
Despite the fact that these patches are"iff" files they do not get installed directly into your game. These are not playable objects or houses. Instead the resources from these files must be disassembled & used to replace resources in the object you want to 'fix', one object at a time.
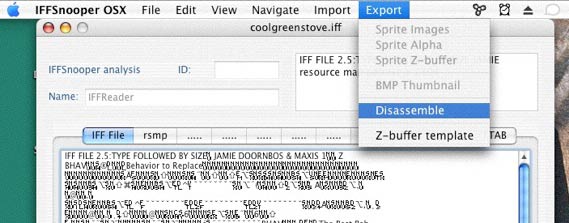
1) Open your "broken" object in IFF Snooper.
2) From the 'Export' Menu choose 'Disassemble'.
You will be given a pop up box asking you to name the folder, accept the default name & Save.
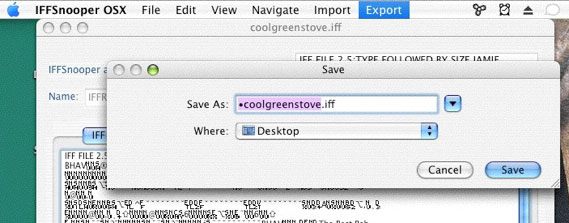
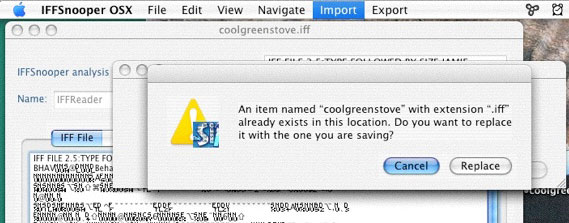
This will create a folder on your desktop, which contains the disassembled resources of your original object. If the object was named, for instance, coolgreenstove.iff the folder will be named *coolgreenstove.iff

3) Open the 'sswPatch' file for the object you want to fix in Iff Snooper. Just as in step 2, Export/Disassemble from the Menu, and Save the resources folder to the desktop
4)Now, open the folder created from the disassembling the fix in step 3.
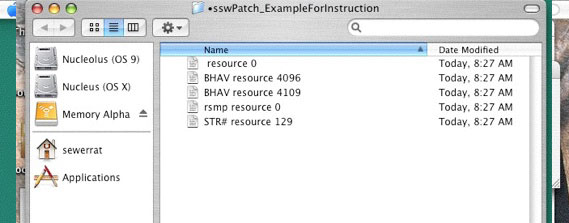
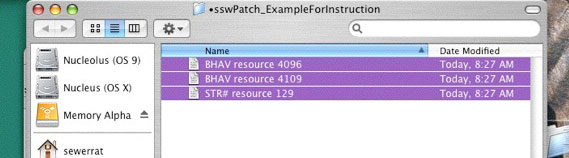
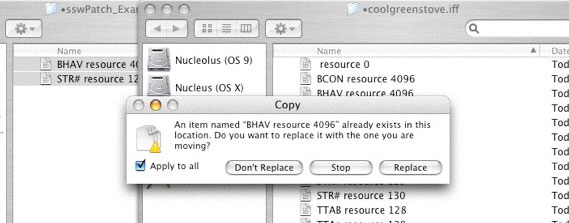
There will be a few files in there, they are all 'resource files' which will replace the same resource files in your disassembled object. There will also be 2 files in the folder, the resource 0 & rsmp 0 which are not needed: discard them. Drag ALL the other files (which will usually beginning with BHAV, BCON, or SLOT) in the folder & drop them onto the folder of disassembled resources you created in step 2 (i.e. *coolgreenstove.iff).
You will be asked if you want to replace the Files already in the folder with the new ones. Click 'Apply to All' & say yes.
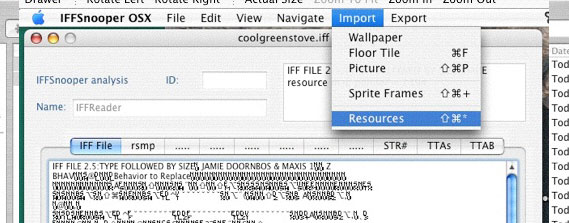
5) Open Iff Snooper (double click on the .iff file for your "broken" object), and choose Import/Resources from the menu.
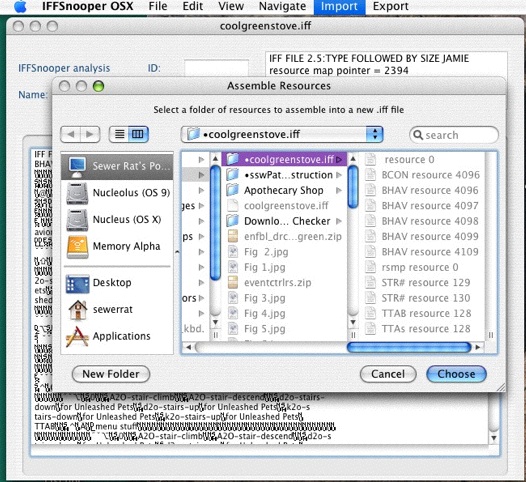
Choose the resources folder that you just dragged your fix resources into (i.e. *coolgreenstove.iff).
You will get a pop up box asking you to name the file: choose the default name & click Save.
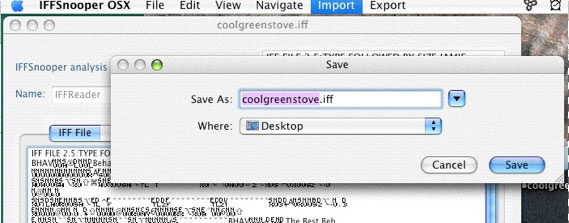
You will get another pop up asking if you want to overwrite the file of the same name already on your desktop. Click Replace.
Now the file on your desktop is fixed & ready to be tested in game.
All Done :)
Three notes of advice:
- Save a backup copy of your original object.
- Download and use the appropriate "FIX" files.
- Practice applying the fix on one file and then stop and test it before doing a whole batch.